DIY 3D-Printed Project Tray Rack for Cheap, Easy Organization

The Problem
A few months ago, I stumbled on these baking trays at the dollar store for $1.25 each, and they quickly became my go-to for keeping projects organized. I’ve picked up about twenty of them since, because they’re just that useful. Whether it’s keeping all the parts for a project in one place, or even acting as a spill tray when I’m dealing with liquids, they’ve been a simple, cheap solution.
The issue, though, is that once you put stuff on a tray, you can’t stack them anymore. At first I tried using those adjustable wire shelving units from Lowe’s, spacing the shelves closer together so I could slide trays in. It kind of worked — I could fit about four trays per shelf, with three shelves total, giving me room for around twelve projects. But the shelves themselves got in the way, it was tough to see what was where, and of course I had other stuff taking up space too. I needed something more vertical, more open, and better suited to trays specifically.
The Idea
The trays themselves worked great — I just needed a better way to stack and access them. The solution that came to mind was those tall bakery racks where sheet pans slide in and out. I liked that idea, but I didn’t want to spend money on a big commercial rack, and I also wanted something I could size exactly for my dollar store trays.
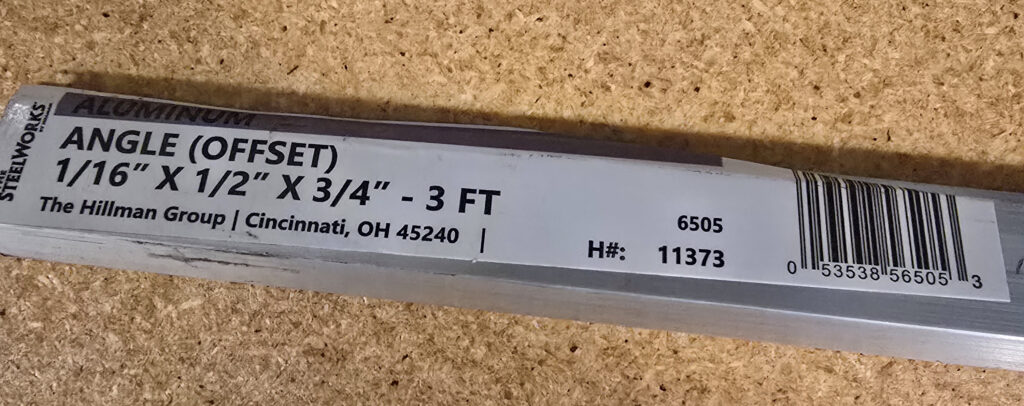
That led me to a mix of materials: aluminum for strength, and 3D-printed parts for the custom connections. I’d been wanting to experiment with aluminum anyway, and this felt like an approachable place to start. Lowe’s had L-shaped aluminum for about $8 per three-foot piece — half an inch on one side, three-quarters on the other, only a sixteenth of an inch thick, but surprisingly sturdy because of the profile. Cutting it to length was basically the only “metalwork” required.
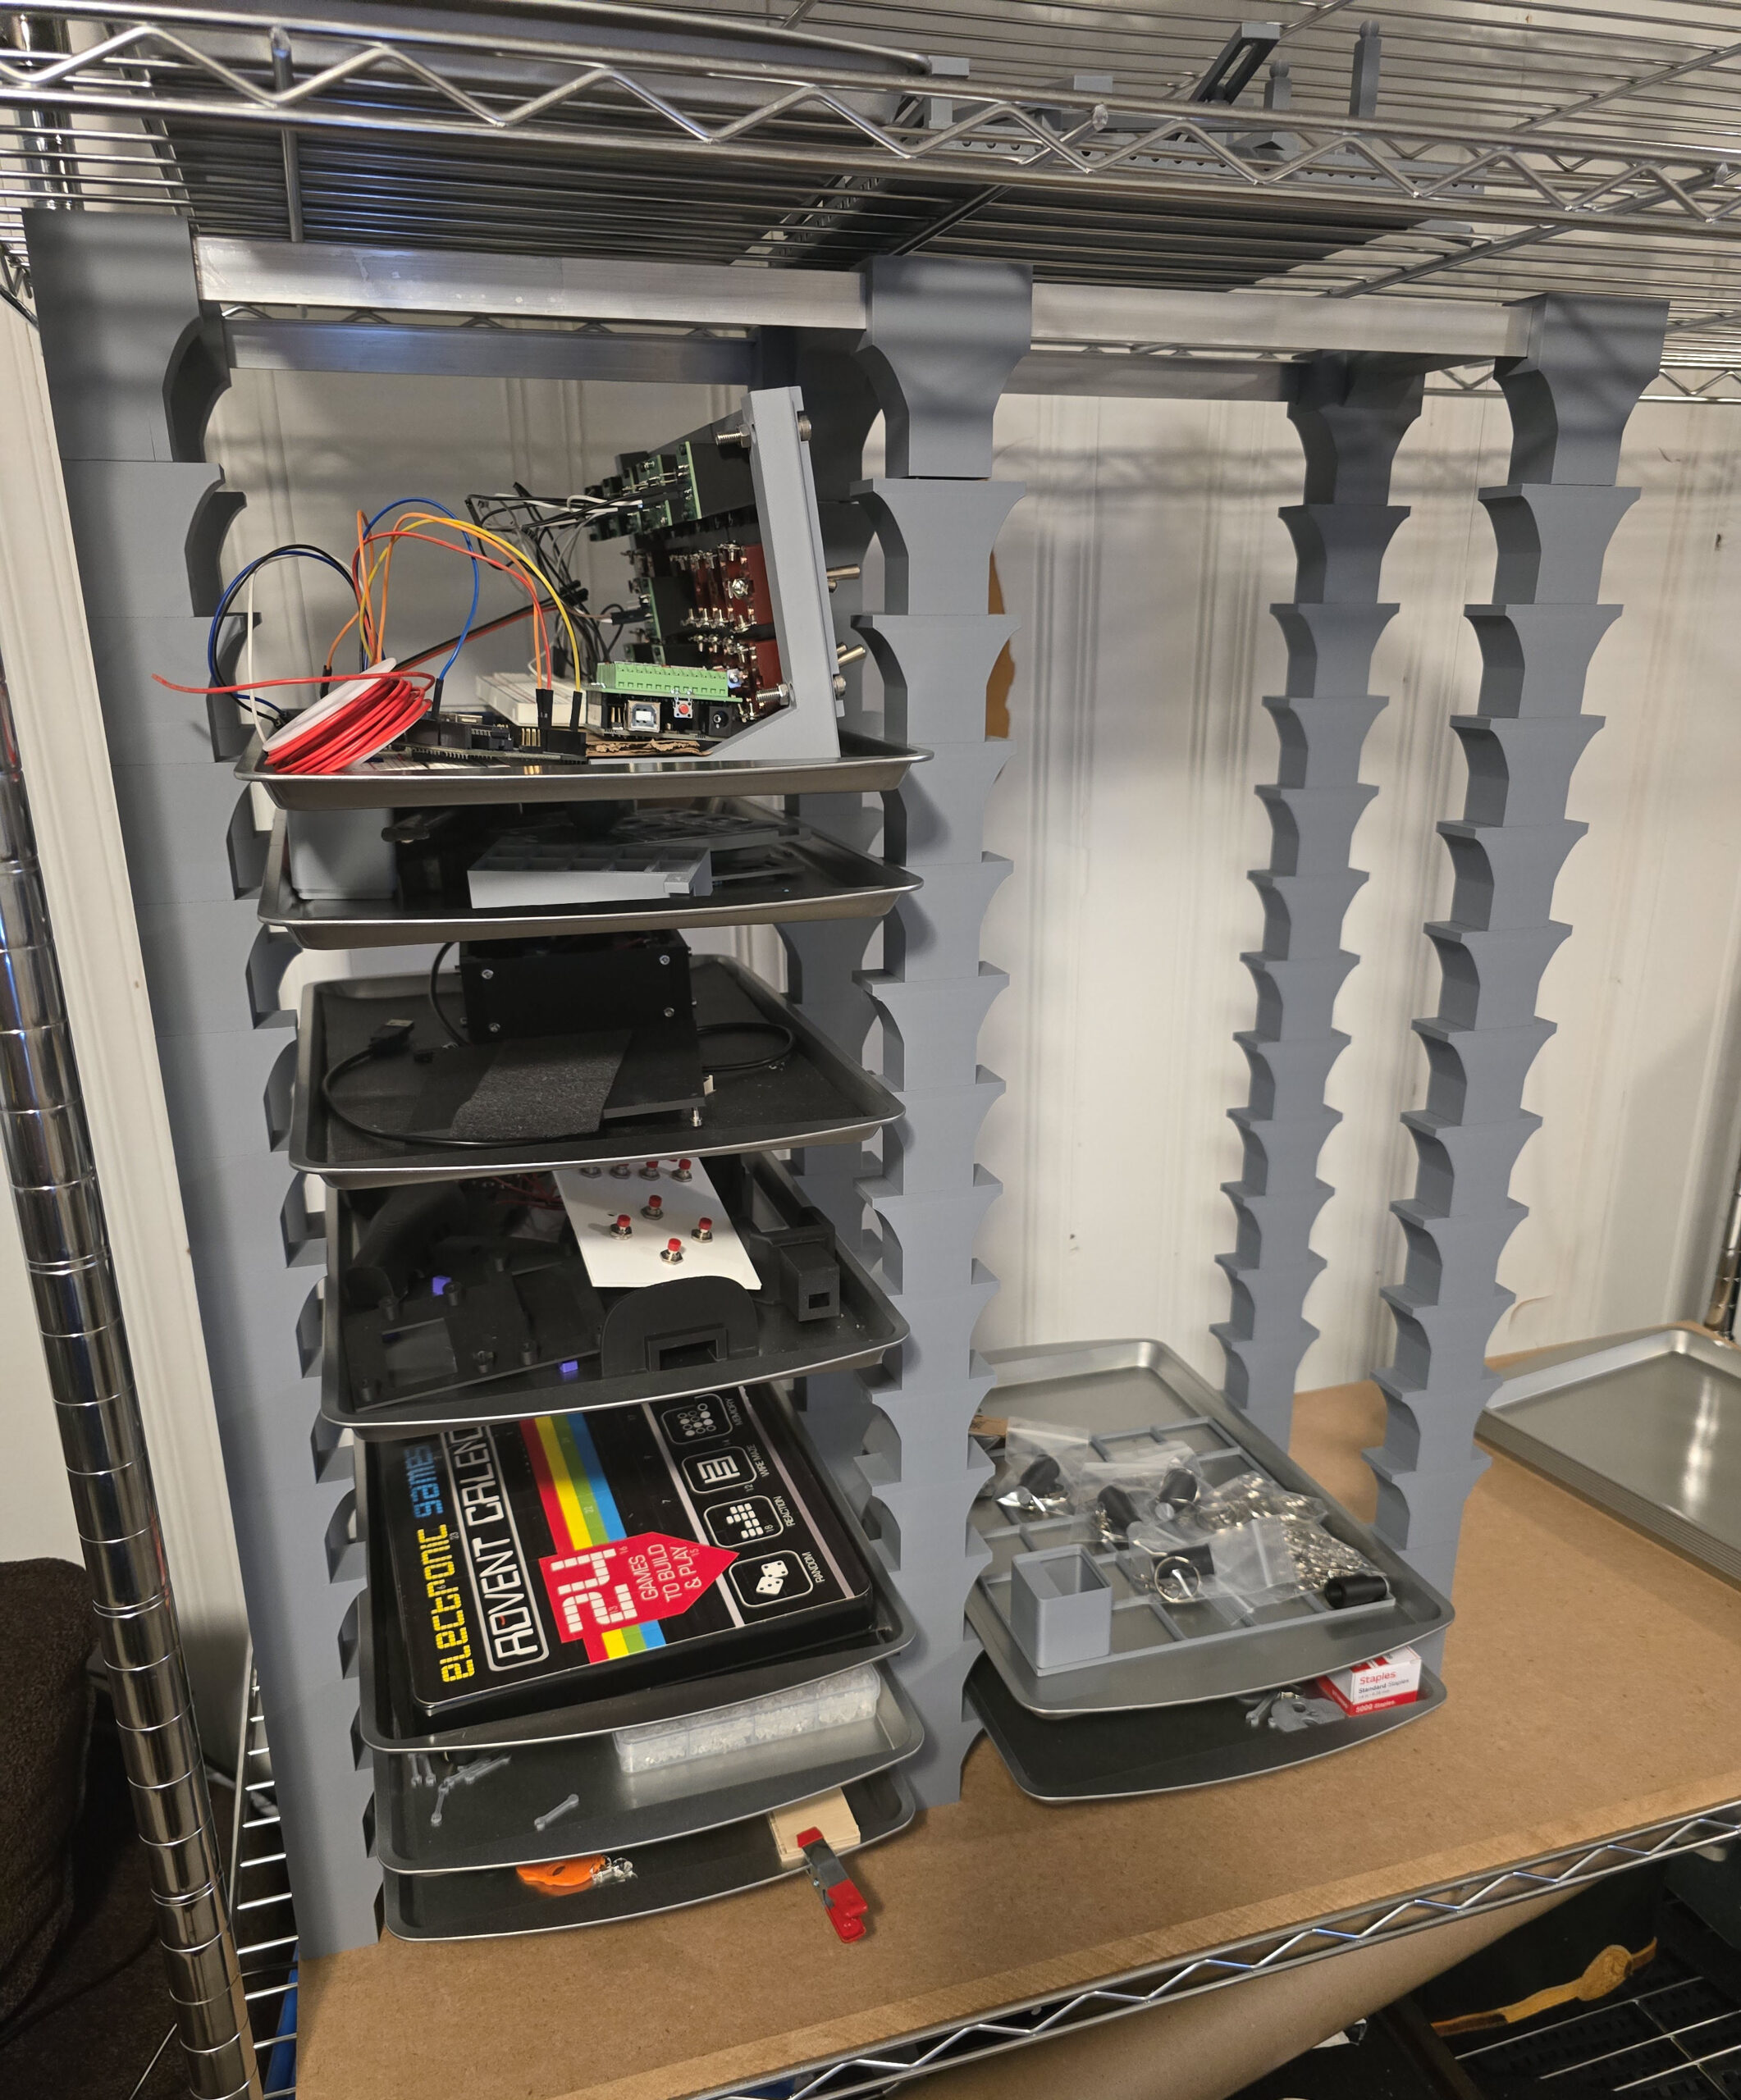
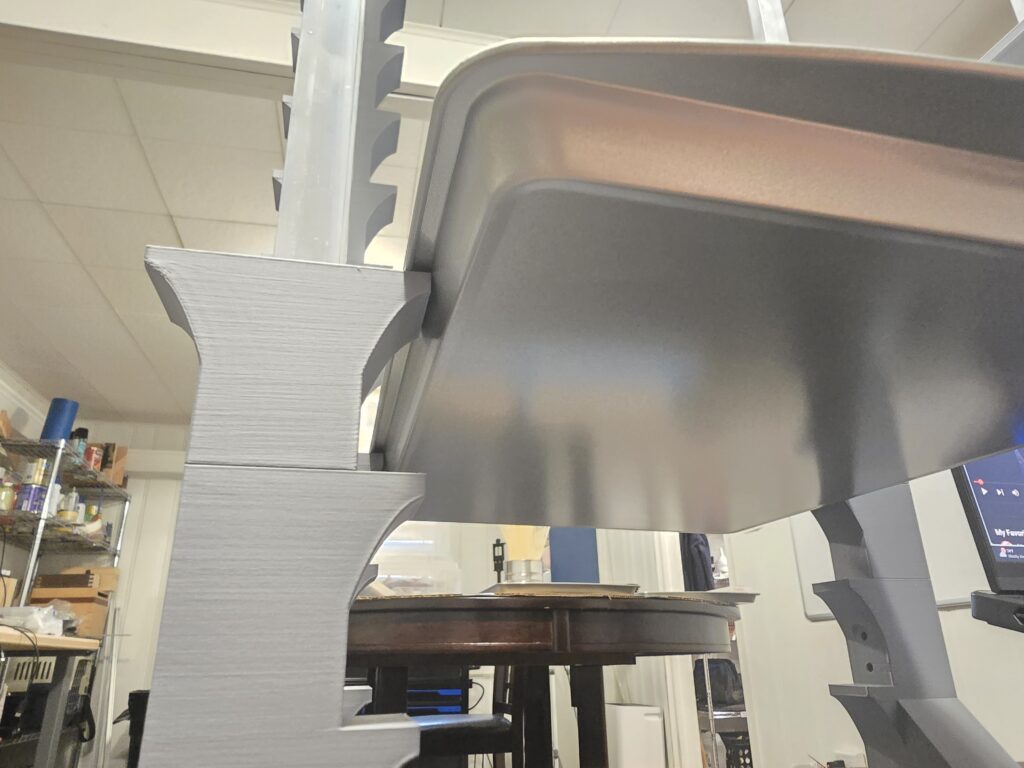
From there, I designed small 3D-printed parts that could slide snugly onto the aluminum. Each piece has a little overhang that acts as a support for a tray. Four aluminum rails run vertically, and for every “shelf,” four printed pieces lock onto the rails at the same height. The trays rest on those overhangs, sliding in and out just like the bakery racks that inspired me — but sized perfectly for my $1.25 project trays.
The Build
Once I settled on the idea, the first stop was Lowe’s to see what aluminum they had. That trip set the first real constraints for the project: the L-shaped stock came in three-foot lengths, so my rack couldn’t be any taller than that. I could have gone bigger or thicker if I wanted to spend more, but keeping it cheap was part of the fun. At about $8 per piece, these seemed perfect.
My plan was to mount the aluminum vertically on an MDF wood base that I have on my shelf — something sturdy that I wasn’t afraid to screw into. Then I used another piece as a crossbeam across the top to tie everything together and cut down on wobble. I measured the trays, figured out how much width I needed, and whatever was left over became the height of the rack. To keep things consistent, I stacked the four pieces and cut them all at once on my chop saw. It was actually my first time cutting aluminum, and I was surprised by how easy it was.
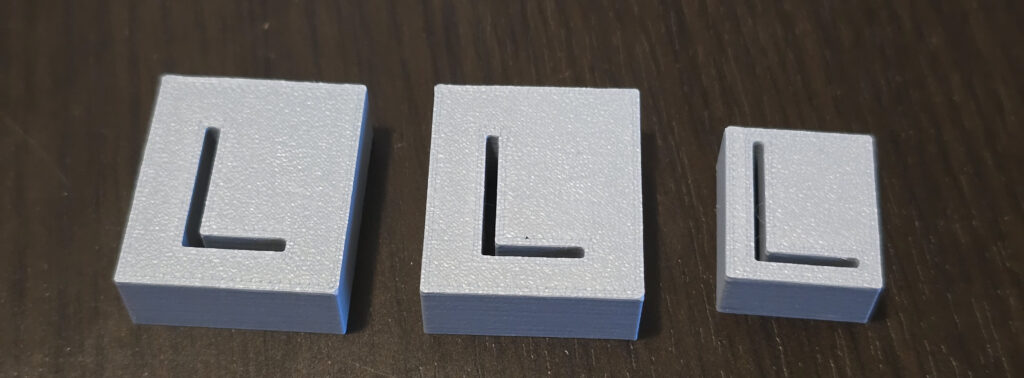
From there, I started with some quick prototyping to make sure I had the aluminum profile right before committing to larger prints. Printing tiny test blocks first meant I could dial in the fit without wasting plastic. It took a few tries, but once I got that snug-but-slidable fit, I set those dimensions as parameters in Fusion 360 and started building out the actual shelf supports.
I ended up with a vertical spacing of 50mm between shelves, which felt like the right balance of space for the trays without wasting height. Each printed piece has a little overhang that the tray rests on, and since there are four aluminum rails, I needed four of these per shelf. At first I was only planning on a single column of trays, but then I realized I could make the parts double-sided and run two columns side by side. That saved on plastic and gave me more storage without much extra effort.
Right now I’ve got two full columns built and space for a third. The only holdup is materials — Lowe’s has been out of the exact aluminum I used, and while I could redesign the parts to fit a different size, I haven’t maxed out the current rack yet. For now, I’ll wait and see if they restock before I expand.
The Result
The rack is far from perfect, but it does exactly what I needed — it gets my trays off the workbench and keeps projects organized in a way that works. For now, that’s mission accomplished. I’ll call this version “good enough” and move on to other projects, though there are definitely areas I’d revisit if I decide to refine it.
One flaw I ran into was with the top end caps. These pieces hold both the vertical rails and the crossbeams, and one of them cracked under the leverage of the aluminum. PLA is strong, but with the channel depth being short and the force applied right along the layer lines, it wasn’t much of a surprise. The piece still works well enough, so I didn’t bother reprinting it, but if I redesigned it I’d probably lengthen the channel, thicken the walls, or increase infill for more strength.
Printability was another challenge, especially with the top end caps. Since their cutouts run both horizontally and vertically, no matter which way I oriented them, one side was always going to have a tricky overhang. My first attempt sagged badly, but I eventually solved it by printing both caps together as one long piece and using supports with a bridge across the span. That kept the orientation right and limited the overhangs to something manageable.
I also toyed with the idea of drilling and tapping the aluminum so I could bolt the printed parts in place. I even added mounting holes to some of the early designs. But once I tested the fit, everything felt snug enough that I decided it wasn’t worth the extra time and complexity. It would’ve been a fun exercise in precision tapping, but not really necessary for the rack to function.
In the end, the project gave me exactly what I was after: a vertical, compact way to store my trays. It’s sturdy enough, expandable, and a great mix of 3D printing and simple aluminum work. I may come back to refine the weak points later, but for now it’s doing its job — and doing it well.
Files / Resources
If you’d like to make your own version of this project tray rack, the STL files are available here for free download:
- STL files: 3D Printed Project Tray Rack – Douglas Beach
- Printed in PLA (feel free to use whatever material works best for you)
- Sized for dollar store baking trays (about 13″ × 9″) and Lowe’s aluminum angle (½” × ¾”, 1/16″ thick, 36″ long)
If you end up building one, I’d love to see it! Feel free to share a photo in the comments below.